
Fun and Easy Ghost Cookies Recipe. Perfect for Halloween Treats!
The moment fall hits and stores begin stocking bags of candy, my kitchen turns into a mini Halloween bakery. One of my favorite treats for spooky season? Ghost cookies. These eye-catching little sweets are ridiculously easy to make, you don’t need any fancy equipment, and they add instant charm to any party snack table. I’ve checked out a bunch of versions over the years, but I always return to this recipe whenever I want a crowd-pleaser that’s both cute and super tasty.
Worried about baking skills? No problem at all. This recipe keeps things simple and fun, with step-by-step instructions anyone can follow. Kids especially love getting involved, so this is a great project for a family afternoon. These cookies also make fun lunchbox surprises or thoughtful homemade gifts for your neighbors. Soft and chewy sugar cookies form the base, and a quick icing plus some creative decorating bring them to life as hauntingly adorable ghosts.
Over the years, I’ve experimented with different flavors and decorations. Sometimes we add a little lemon zest or swap the vanilla for maple extract for a fall twist. You can even put a personalized spin on your icing colors and faces to fit your own Halloween theme. No two ghosts look the same, and that’s part of the fun.
Why Are These Ghost Cookies So Popular?
- Simple, pantry friendly ingredients. You won’t need anything unusual. Everything is easy to find or likely already in your cupboards.
- No special cutters needed. The shaping is freeform and forgiving, so each “ghost” will have its own personality.
- Easy, beginner-friendly steps. No fancy pastry bags or skills required; just mix, shape, and bake.
- Decorate any way you want. Kids love helping with the icing and chocolate “faces,” making it an all-ages activity.
- Always a hit at gatherings. The playful ghost shapes fit any Halloween or fall event perfectly.
You can also change the decorations to make them little mummies or monsters by adding details with icing or using colorful candies. If you really want to turn things up a notch, add edible eyes or edible glitter for next-level cool effects!
Ingredients for Ghost Cookies
Here’s the list of simple ingredients I use to put together a batch of these spooky cookies:
- 2 3/4 cups all purpose flour
- 1 teaspoon baking soda
- 1/2 teaspoon baking powder
- 1/2 teaspoon salt
- 1 cup (2 sticks) unsalted butter, softened
- 1 1/2 cups granulated sugar
- 1 large egg
- 2 teaspoons vanilla extract
- 3-4 tablespoons milk (as needed for the dough)
- For the icing:
- 2 cups powdered sugar
- 2-3 tablespoons milk (plus more as needed for adjusting consistency)
- 1/2 teaspoon vanilla extract
- Black decorating gel or mini chocolate chips (for making faces)
How to Make Ghost Cookies. Step-by-Step Guide
1. Get Your Oven and Dough Ready
Start by preheating your oven to 350°F (175°C). Line two baking trays with parchment paper to keep the cookies from sticking. In a medium bowl, whisk together the flour, baking soda, baking powder, and salt. In a large bowl, cream the softened butter and granulated sugar using a hand mixer or sturdy whisk until light and fluffy. Mix in the egg and vanilla, blending it all together.
2. Complete the Dough
Add the dry mix to your butter mixture a bit at a time. When the mixture looks crumbly, drizzle in a tablespoon of milk at a time until the dough holds together and feels soft, but not sticky. If it feels a little too dry, add another tiny splash of milk.
3. Shape Your Spooky Ghosts
Scoop out about two tablespoons of dough for each cookie. Roll each into a rough ball, then flatten it a little and tug one edge down to create a “ghost tail.” There’s no need for perfection. Ghosts all have their own unique spookiness. Place the shaped cookies about two inches apart on your prepared trays.
4. Bake Until Just Right
Bake your cookies for 9-11 minutes, or until the edges are set but the centers are still pale. Don’t overbake; you want them soft and chewy with the lightest golden color at the bottom. Let them cool on the trays for five minutes, then move them to cooling racks.
5. Make the Icing
While your cookies are cooling, stir together the powdered sugar, vanilla, and two tablespoons of milk in a small bowl. Add more milk, drip by drip, until your icing is thick enough to drizzle but still holds its shape when piped. If you go too thin, just stir in a tablespoon of powdered sugar until you get the right texture.
6. Time to Decorate
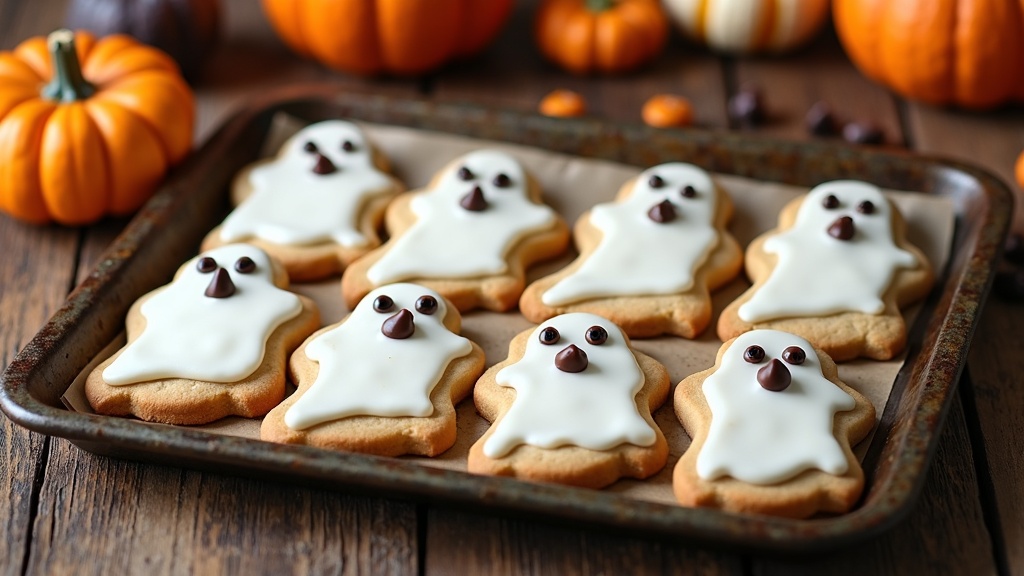
When your cookies are totally cool, spoon or pipe the icing thickly on top. Let some drip down for more of that floaty ghost effect. Quickly, before the icing sets, press on two chocolate chips or use dots of black gel for the eyes, plus one for a mouth. Let everything dry before stacking or packing your cookies. If you want a happy ghost, curve the “mouth” up; for a spooky one, do a little oval or zig-zag. It’s up to you!
Tips, Tricks, and Fun Mix-Ins
- For bonus flavor, throw in a teaspoon of almond extract or a pinch of cinnamon to the dough.
- Want to make shaping neater? Chill the dough in the fridge for 30 minutes so it’s less sticky and easier to handle, especially in a warm kitchen.
- If you prefer precise decorating, you can use royal icing instead of the simple glaze. Make sure your cookies are completely cool before adding any icing.
- Step up the decoration game with edible glitter or colored sanding sugar over the wet icing. It gives your ghosts some next-level cool shine.
- For those avoiding chocolate, swap in small dots of black icing or even raisins for the faces.
- If you want to make your cookies look extra detailed, use a toothpick or skewer to drag out “arms” or make little ghostly hands.
- You can even flavor your icing by adding a splash of maple syrup, orange zest, or peppermint for a seasonal twist.
Common Questions About Ghost Cookies
Q: How do I store my ghost cookies?
Keep cookies in an airtight container at room temperature. They’ll stay soft and yummy for up to five days. If you need to stack them, place a sheet of wax or parchment paper between layers to protect the icing from smearing.
Q: Can I make the dough ahead of time?
Absolutely! You can keep the dough wrapped up in the fridge for up to two days, or freeze it for up to a month. If using from the fridge, let it sit out for about 10-15 minutes so it softens up, making shaping easier.
Q: Are these cookies freezer-friendly?
Yes, but freeze the undecorated cookies for best results. When you’re ready, thaw and then add the icing and decorations just before serving. Freezing with icing can make the decorations sweat or bleed into the cookie.
Q: Can I use storebought cookie dough as a shortcut?
Sure thing. Pre-made sugar cookie dough from the refrigerated section works well if you want to get your cookies ready quickly. Just shape, bake, and decorate your adorable ghosts as described above.
Let Your Ghost Cookies Steal the Show!
This recipe is a total win for Halloween baking or any time you want to bring some spooky cheer into your kitchen. Grab your ingredients, invite a friend over, or let the kids get creative with decorating. No two cookies need to look alike, and there’s no wrong way to make your ghost cookies stand out. If you snap a picture of your finished cookies, I’d love to see them. Each ghost cookie has its own personality, and the more, the merrier!
For more Halloween baking fun, try mixing in other shapes—bats, pumpkins, or monsters—using the same dough and icing method. You’ll end up with an all-in-one tray of treats that everyone will love. Whether you’re throwing a spooky party, handing out homemade gifts, or just craving something sweet, these cookies are guaranteed to put a smile on everyone’s face. Happy baking, and may your ghosts be as cute or spooky as you like!
if you have any questions or comments, please leave them down below and I would be happy to help out.