Adorable Ghost Cake Recipe for Spooky Fun
No Halloween party or fall get-together feels complete without a fun themed dessert. For me, ghost cakes have become a favorite for adding a bit of playful spookiness, and they’re always a conversation starter. This ghost cake recipe checks all the boxes: easy to put together, super cute, and full of classic flavors that kids and grownups both go for.
Working with simple ingredients and a bit of decorating creativity, you’ll get not only a tasty cake but also an eye-catching centerpiece. Whether you’re new to baking or a total pro, making a ghost cake is pretty approachable. It never fails to bring out plenty of grins (and maybe a few playful scares).
Why Make a Ghost Cake?
- Easily adapts for any skill level. There’s no need for fancy tools or specialist skills to pull this off.
- Perfect for Halloween parties or movie nights. This cake looks awesome on the dessert table, or even as a surprise treat after dinner!
- Fun to make with kids. Little ones get a kick out of decorating the ghosts and adding their own spooky touches.
- Classic vanilla and chocolate flavor combo. With a tender crumb and fun marshmallow decorations, it’s a crowd-pleaser.
If you like, you can check out other creative holiday cake ideas and swap flavors without losing the fun ghosty vibe. Giving this a try at your next party could be just what you need to step up your festive baking skills!
Ingredients (for an 8-inch Layer Cake)
Here’s everything that goes into the cake and those whimsical ghost decorations:
- 2 1/4 cups all purpose flour
- 2 teaspoons baking powder
- 1/2 teaspoon baking soda
- 1/2 teaspoon salt
- 3/4 cup unsalted butter, softened
- 1 1/2 cups granulated sugar
- 3 large eggs, room temperature
- 1 tablespoon vanilla extract
- 1 cup buttermilk (or milk + 1 tablespoon lemon juice as a sub)
- 1/3 cup sour cream
- 1/2 cup mini chocolate chips (optional, but I like the extra texture!)
For the Ghosts and Decorations:
- 10 to 12 large marshmallows
- White candy melts or melted white chocolate (about 1 cup)
- Black gel food coloring or melted semisweet chocolate (for faces)
- Mini chocolate chips or candy eyes (for decorating)
For the Frosting:
- 1 cup unsalted butter, softened
- 3 1/2 cups powdered sugar
- 1/4 cup milk or heavy cream
- 1 tablespoon vanilla extract
- Pinch of salt
Before you start, lay out all your ingredients so you don’t miss a thing. It helps make the process smoother, especially if you’re baking with little ones who love to help.
Baking and Building Your Ghost Cake
1. Bake the Cake Layers
Preheat your oven to 350°F (175°C). Grease and flour two 8-inch round cake pans, or line them with parchment for easy release. In a bowl, whisk together flour, baking powder, baking soda, and salt. Set aside.
In another bowl, cream the butter with sugar until light and fluffy. Add eggs one by one, blending after each. Stir in vanilla. Mix in about half the dry ingredients, then add your buttermilk and sour cream. Finish with the rest of the dry mix, and blend until just combined. Fold in those mini chocolate chips if you’re using them.
Divide the batter evenly between the pans. Bake for 24 to 28 minutes, or until a toothpick poked in the center comes out clean. Let them cool in pans about 10 minutes, then transfer to racks to finish cooling. Cakes must be fully cooled before frosting.
If you want to mix in a little variety, consider stirring in a small amount of orange zest or a pinch of pumpkin spice to give your cake some subtle autumn notes. This adds aroma and seasonal flavor without overcomplicating the recipe.
2. Prepare the Frosting
Beat the butter until creamy and pale. Add powdered sugar, one cup at a time, and mix on low to minimize sugar fluff. Pour in vanilla, milk or cream, and salt. Beat until smooth and fluffy, about 2 to 3 minutes. If it feels too thick, add more milk by the teaspoon.
Want color? You can put in a few drops of orange or purple gel food coloring for a more Halloween vibe, or keep it bright white for classic ghosty looks.
3. Assemble and Frost
If your cakes are a bit domed, I recommend leveling them with a serrated knife. Place one cake layer on your serving plate, spread with frosting, then top with the second layer. Frost the sides and top fully, smoothing out with a spatula or the back of a butter knife for a homemade look. Don’t stress over absolute perfection; a little imperfection only adds to the charm.
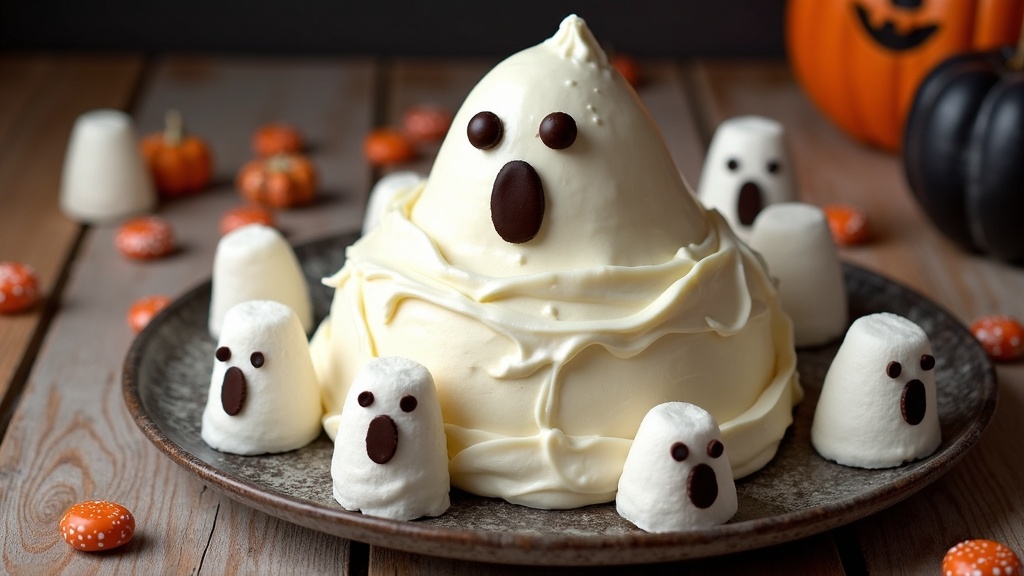
How to Make Marshmallow Ghosts
1. Coat the Marshmallows
Melt your white candy melts or chocolate (microwave in 20-second bursts, stirring in between). Skewer a large marshmallow on a toothpick or fork, dip it into the melted coating, and turn until covered. Let any extra drip off. Set the coated marshmallows on wax paper or a rack to harden. Repeat with all marshmallows. You’ll likely need 10 to 12 ghosts for a standard cake.
If you have time, you can make extra marshmallow ghosts and set them around the serving plate for even more fun.
2. Create Spooky Faces
Once the coating has set (about 15 minutes at room temp), dab on ghostly features with black gel coloring or tiny dots of melted chocolate and a toothpick. Classic dot eyes and ovals or wobbly mouths work great. Honestly, the goofier, the better! Don’t worry if some ghosts look surprised while others look silly; it all adds personality to your cake’s theme.
3. Attach to Your Cake
Gently press each marshmallow ghost onto the top of your cake, standing them upright. If you have leftover frosting, use a blob underneath each ghost for more sticking power. Scatter some candy eyes or mini chocolate chips around for extra spooky detail. For an added layer of spookiness, add extra chocolate chips in random patterns for that “haunted” atmosphere.
Decoration Ideas and Variations
- Try popcorn or cotton candy “fog” around the base for a haunted effect.
- Add colored sprinkles or orange and black candies for festive flair.
- Pipe frosting to swirl around your ghosts, making it look like they’re rising from clouds.
- Use chocolate cake layers if you want a deep, rich chocolatey bite. The decorating method stays the same, just swap in your favorite chocolate cake recipe.
- Mix in some variety by placing your marshmallow ghosts in different positions and stances—clustered for a ghost gathering or scattered for a spookier scene.
For some next-level cool, add edible shimmer dust or gold luster dust on your ghosts so they sparkle under the lights. You’ll be surprised at how much this steps up the look!
Troubleshooting and Tips
- Batter will be thick, so don’t worry! This helps the cake stay tender and sliceable.
- If your marshmallows tip over, chill the cake for 10 minutes to help the frosting set, then press them into place again.
- Not a fan of artificial coloring? Melt chocolate for faces instead of using gel color.
- Store leftovers in an airtight container at room temperature for two days or in the fridge for up to four days. Let the cake come to room temp before serving for the best texture.
- If your marshmallow coating is drying too slowly, move it to a cooler part of your kitchen or pop the tray in the fridge briefly to speed things up.
- Want to pack the cake to take to a party? Use toothpicks to help keep the ghosts stable for transport, just remember to remove them before serving.
Common Questions About Ghost Cakes
Q: Can I make the cake ahead?
Yes! Bake cake layers up to two days ahead. Wrap tightly and frost the day you plan to serve. The marshmallow ghosts can be decorated several hours in advance, as long as you keep humidity low. This way the coating doesn’t get sticky and the faces stay sharp.
Q: My coating for the ghosts is too thick or lumpy. What can I do?
Add a bit of coconut oil or shortening to the melts to thin them out if needed. Stir well between heating sessions, and don’t let the chocolate scorch in the microwave. Smooth, even coating makes those ghosts pop!
Q: Are there allergy friendly swaps?
For dairy free: Use vegan margarine, a non dairy milk, and allergy friendly marshmallows and candy melts. Gluten free: Substitute your favorite 1-for-1 gluten free flour blend for the regular flour. Stumble upon brands that work for your family—inclusive baking always leads to more smiles.
Q: Can I freeze the cake?
You can freeze the unfrosted cake layers. Wrap them up well, then thaw and frost when you’re ready for decorating. Marshmallow ghosts are best freshly made, but if you need to make them ahead, store them in a cool, dry spot.
Share Your Spooky Bakes!
Give this ghost cake a try whenever you want to bring some spooky fun to your kitchen. I always enjoy seeing how folks put their personal spin on the decorating. Feel free to let me know how it went, and share your creepiest or cutest ghost faces. Wrap it up with a big smile, and happy baking for a fabulously festive Halloween!
if you have any questions or comments, please leave them down below and I would be happy to help out.